Zorki 4 & 4K 35mm Rangefinder Camera Instruction Booklet
Introduction
Your zorki camera is sturdily built and will work happily under widely varying conditions. Do remember, though , that it is precision built optical instrument and should therefore be handled carefully and protected from violent shocks ,damp, dust and sudden changes of temperature . Take care of your Zorki camera and it will give you years of relialble service and brililant picture . There is a wide range of accessories available ,offering outstanding value for money to enable you to cope with almost any photographic assignment. you can build up as complete and outfit as you need at your own place.
The following features apply to both cameras although only the Zorki 4 Illustrated
To get he best possible results from your Zorki study this booklet thoroughly before ou start to take pictures to make sure that you are familiar with the essential features of the camera. Refer back to the booklet any time there is something you are not sure of.
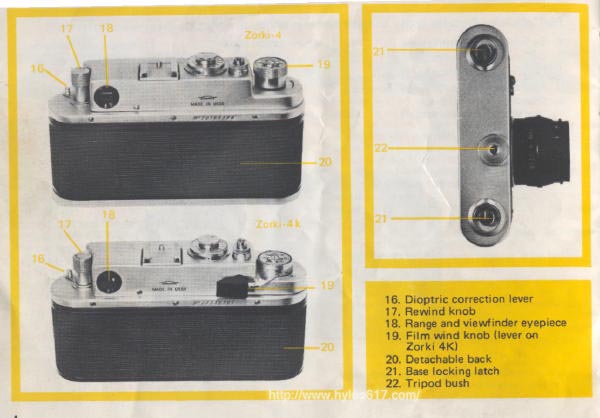
Back & Bottom View
Finally . if anything should go wrong with your Zorki camera. for any reason whatsoever, never try to mend it yourself; you could turn a minor adjustment into an expensive repair. Remember that your Zorki and its accessories are backed by top-class service facilities. Factory tranined specialist can put things right quiclkly and inexpensively.
Important Note
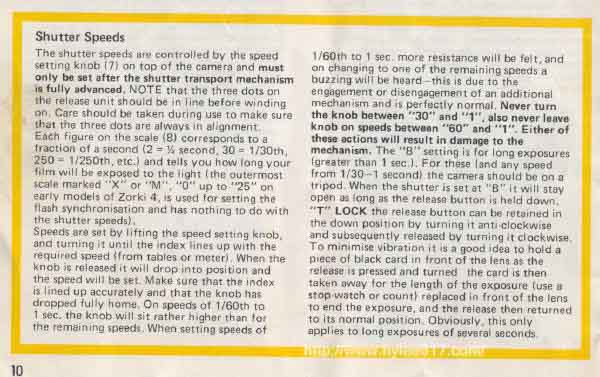
1. The 3 dots on the release unit must be in line before winding the shutter.
2. Set shutter speed only when shutter is fully wound on.
3. Dont't leave speed setting knob on speeds between "60 and 1 "
4.Never turn speed setting knob on speeds between "30 and 1 "
5. Fit lens cap when not in use to protect lens and prevent sunlight focussing on the blind causing damage.
There may be minor differences betweens your camera and this instruction manual due to ever-advancing development in design.
Loading
Your Zorki will accept any standard 35mm cassette( color or B&W
film in 12;20 or 36 exposure lengths) . Never load the camera in
bright or direct sunlight-rember you can easily provide shade
for film loading by tyrning your back against the sun and using
your own shadow.
Remove the camera from its case by undoing the
case screw. Pull up the latches ( 21) on the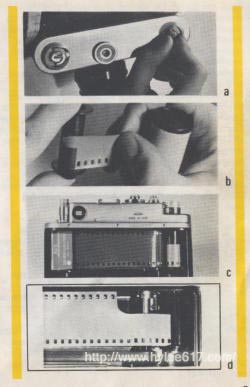 camera base give
them a half turn( Fig A) then the back (20) can be slid downwards
and lifted off. Before inserting the film, check that the shutter
and transport are being fully cocked and that the transport sporocket
is not " free wheeling " by holding the latter back
lightly with the finger, whilst transport lever/ wind-on knob is
turnned to its limit ( 4K ,two or more short strokes are better than
one full turn for this purpose, but do not use excessive force)
camera base give
them a half turn( Fig A) then the back (20) can be slid downwards
and lifted off. Before inserting the film, check that the shutter
and transport are being fully cocked and that the transport sporocket
is not " free wheeling " by holding the latter back
lightly with the finger, whilst transport lever/ wind-on knob is
turnned to its limit ( 4K ,two or more short strokes are better than
one full turn for this purpose, but do not use excessive force)
" Test-fire" the camera by depressign the shutter release button. Should the mechanism not ve engaged properly, first make sure tha the three dots on the release unit are fully aligned( i,e rewind control ( 4) .returned to clockwise operating position and release button( 5). Not in locked-down position ). Then repeat above procedure.
With Zorki 4 the take-up spool should then be removed and the pre-shaped film and pushed fully uner its spring-clip( Fig B) . Replace the take-up spool in the camer having first drawn sufficent film ( about "3") out of the cassette to enable it to be dropped into position in its chamber. With the Zorki -4K the take-up spool is non removable so the casette must be placed into its chamber first. Sufficient film ( about "3") should then be drawn out of the cassette to enable its leading edge to be easily slipped into one of the toothed slots on the take up spool( Fig D) if correctly loaded the film should take up as soon as the lever is turned.
With both cameras it may be necessary to rotate the rewond knob ( pull it upwards first) before the cassette can be pushed fully home into its chamber. The transport sprockets should fully engage in both sets of film perforations and the film must lie flat across the film guides( fig C)
Now place the camera back carefully into the side grooves on the body and as near to the top as possible. Slid the back upwards until fully closed then turn the latches to their original position.where they can be pushed down flat.
Check that the back is properly locked before turning the wind-on
knob/lever(19) gently but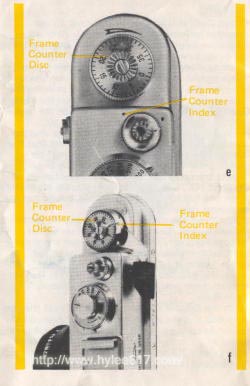 firmly to its limit, to wind the shutter
and advance the film. Now it is wise to carefully wind any slack
film back into the cassette. Press the shutter release and winding
on again, watch to see if the rewind knob(17) revolves at the same
time. Having wound on for the second time and without releasing
the shutter again turn the frame counter disc clockwise, using firm
but gentle thumb pressure on its knurled surface, until the "
o" fiure alighs with the kinds ( see figs E&F) . You have
then to wind on a further time if you are ready to take your first
photograph. The counter will then read number 1.
firmly to its limit, to wind the shutter
and advance the film. Now it is wise to carefully wind any slack
film back into the cassette. Press the shutter release and winding
on again, watch to see if the rewind knob(17) revolves at the same
time. Having wound on for the second time and without releasing
the shutter again turn the frame counter disc clockwise, using firm
but gentle thumb pressure on its knurled surface, until the "
o" fiure alighs with the kinds ( see figs E&F) . You have
then to wind on a further time if you are ready to take your first
photograph. The counter will then read number 1.
Your Zorki is now ready for use and can be replaced in its case, where it should be ratained by screwing uo the case screw. NOTE the case is a tight fit ,never apply undue force when closing the case cove aslo ensure that the lens is set to " infinity" before doing so.
For each pictue you will need to press the shutter release. Wind on for the next picture by turning the wind-on knob/lever as fas as it will go, in the case of the 4K two short strokes are beter than one long stroke to make sure that the mechanism is fully loaded. Avoid leaving the camera in a wound-on positions as this cause undue strain on the mechanism and can result in accidental exposure of the film.
Film Counter
Every time you wind on , the frame counter disc will come to rest with the next division opposite the index mark. The counter tells you how many frames you have taken and when it reaches 12.20 or 36( depending on the film in use) you will need to rewind the film into its cassette and put in a new film. Color film especially should not be left in the camera for long periods, and for the best results should be processed as soon as possible after exposure. Incidentally , do carry a spare film nothing I more annoying than to run out just before the best shor turns up !.
Taking the picture
 Once the camera is loaded you have to consider three aspects
of taking the picture-focus, exposure and composition. The first
two of these are purely technical , and the following sections,
together with a little experience, will enable you to handle your
Zorki with sufficient enough ease that you can concerntrate on the
third aspect composition, which is the artistic one. Composition
is concerned with what you put in your picture and where , and is
largely " up to you" . The way you compose your picture
makes them your individual work and this bookelet can only offer
some helpful advice. . The most important thing is possible form
for producing a finished " work " .For this you must get your focus and exposure correct.
Once the camera is loaded you have to consider three aspects
of taking the picture-focus, exposure and composition. The first
two of these are purely technical , and the following sections,
together with a little experience, will enable you to handle your
Zorki with sufficient enough ease that you can concerntrate on the
third aspect composition, which is the artistic one. Composition
is concerned with what you put in your picture and where , and is
largely " up to you" . The way you compose your picture
makes them your individual work and this bookelet can only offer
some helpful advice. . The most important thing is possible form
for producing a finished " work " .For this you must get your focus and exposure correct.
Most important: Always remember to remove the lens cap before undertaking any photographt , and also, when taking pictures with the camera in its ever ready case, to ensure that the top portion of the case does not obscure the lens.
Depth of field
Sharpness, in photography is a relative concept since the human
eye will accept as sharp, objects which strictly speaking, are not
quite shart. This is very important since the only part of the picture
that is really sharp is the part you focus on ; objects behind and
in front of the main subject will be less sharp as the distance
between them and the subject increases. It is often importanl to
know how much of the picture is poing to be acceptable sharp and
your lens has a special scale( 12) called the depth of field scale
, to give you a good idea if thes.
objects which strictly speaking, are not
quite shart. This is very important since the only part of the picture
that is really sharp is the part you focus on ; objects behind and
in front of the main subject will be less sharp as the distance
between them and the subject increases. It is often importanl to
know how much of the picture is poing to be acceptable sharp and
your lens has a special scale( 12) called the depth of field scale
, to give you a good idea if thes.
The scale has been calculated on the basis of aceptable sharpness and shows, at any given focus distance the nearest and furthest shart planes of your picture. The distance of these depends on not only on the distance at which the lens is focussed, but also on the aperature used ( see sectin on "Exposure) and the scale consists of the lens aperature numbers repeated each side of the main focus index. the distance to the nearest and farthest planes of sharp focus can thus be read derectly on the main distance scale. You can, of course, use the distance scale on the lens to set the focus by estimation byt it is almost always easier and more accurate to use the viewfinder/rangefinder system.
Exposure
This is sometimes called the biggest problem in photography!. but it is not really so difficut. Roughly speaking, any subject can be thought of as a lot of areas of varying brightness, from very brigt( highlights) to quite dark ( shadows).
The problem is to ensure that the film receives the right amount of light to reproduce each of these levels of brightness acceptable.
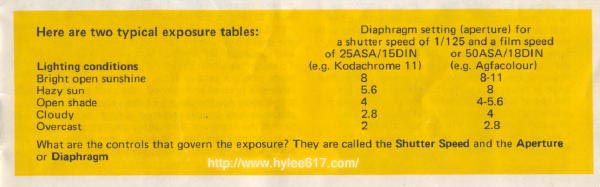
Although this can hardly ever be realised in normal conditions, it is possible in practice to make a reasonable close representation of the original. Film manufacturers have spent much time and trouble evolving films that can be used to cover the various requirements of the photographer and each type of film is given a " speed number" depending on its sensitivity to light. If you know your film speed and how much light is vailable you would be able to calculate the correct settings of the exposure controls on the camera. Since this would be a long and tedious process no-one ever bothers to do it because perfectly good results can be obtained with the help of exposure tables, or.better still, an exposure meter. The tables supplied by manufacturers with each film are usually a very good guide although for the best results, especially with color film , a merter is essential.
Aperatures
These are controlled by moving the lens aperature ring( 14) in either direction and aligning the appropriate figure against the index( 15) . This ring is engraved with a series of figures, called f/nos, wich are relative expressoins of the size of the aperature( or hole) within the lens. The sequence is so designed so that altering from one figure to another either doubles or halves the amount of light reaching the film ( this sequence also applies to the shutter speed scale) . this feature is very useful since it is often necessary to use either a higher shuter speed ( in order to freeze action) or a lower shutter speed ( in poor light conditions) . Likewise the aperature often needs to be made smaller or lager to either increase or restrict the depth of field e,, if "30"(1/30 sec) on speed dial and "11"(f/11) on aperature scale is the correct exposure( as determined by meter or tables) then altering speed to "60" (1/60th) necessitates altering the aperature scale to "8" resulting in the same effective exposure whilst utilising a higher shutter speed as may be demanded by circumstances.
Composition
 Although the final control of composition lies in the hands of
the photographer , here are a few ideas which may be helpful.
Although the final control of composition lies in the hands of
the photographer , here are a few ideas which may be helpful.
Try to avoid putting the main subject in the centre of the frame ; it is usually more interesting to place the most important parts of the picture near imaginary lines dividing the picture vertically and horizontally into thirds. With the standard lens on he camera you can use the cameras viewfinder to compose directly. For other lenses you should use the universal viewfinder which slides into the accessory shoe on top of the camera.
Try to include something in the foreground of landscapes. A picture of distant scenery will often be improve just by a bush or flower in the foreground.
Try to avoid tilting the camera to include the top of a high building , because in the final picture it will look as if the building is falling over backwards. The best results will only be obtained by using a wide angle lens( jupiter-12 or Orion -15) which should also be used for interiors and groups in restricted spaces.
Try not to take pictures of objects that are too far away to
appear a reasonable size in your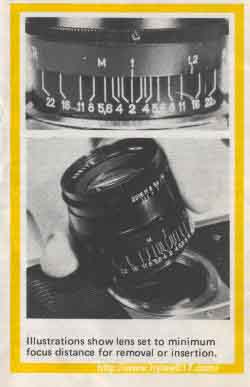 picture.
People should be about half the height of the picture. The only
sure wat to get a good picture of something you cant not get close
enough to is to use a telephoto lens or long focus lens( jupiter-,jupiter-11)
which are also almost essential for portrait work. All of the lensed
mentioned will " couple" to the zorkis rangefinder ( that
is , you can focus just as if you were using the standard lens)
but require the accessory viewfinder for composition. When it is
required to change the lens , set the shortest distance obtainable
and remove the lens from the camera by turning it in an anti-clockwise
direction. When screwing the new lens into the camera the distance
scale should again be set to the shortest distance obatainable.
picture.
People should be about half the height of the picture. The only
sure wat to get a good picture of something you cant not get close
enough to is to use a telephoto lens or long focus lens( jupiter-,jupiter-11)
which are also almost essential for portrait work. All of the lensed
mentioned will " couple" to the zorkis rangefinder ( that
is , you can focus just as if you were using the standard lens)
but require the accessory viewfinder for composition. When it is
required to change the lens , set the shortest distance obtainable
and remove the lens from the camera by turning it in an anti-clockwise
direction. When screwing the new lens into the camera the distance
scale should again be set to the shortest distance obatainable.
When taking close-up pictures remember that the view thorugh viewfinder and lens do not quite coincide since the viewfinder is above and to the left of the lens. To correct for this compose close-up picture so that the centre of the picture lies below and to the right of the centre of the viewfinder. A little experience will enable you to judge the correction quite accurately. Correction is not usually necessary for distances greater than 1 metre with the standard lens. If you watch a professional at work you will see the use he makes of lenses of different focal lenghts-and you will soon start to find situations where you would like a lens that " has a little more rach" or "gets a bit more in".
Flash and your Zorki
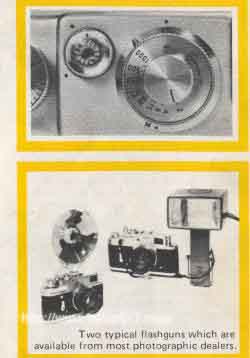 Under certain conditions some form of auxiliary lighting will
be required . For this purpose your Zorki has a built in synchronizer
which enables you to use electronic or bulb flash guns.
Under certain conditions some form of auxiliary lighting will
be required . For this purpose your Zorki has a built in synchronizer
which enables you to use electronic or bulb flash guns.
Electronic flash guns are usually mor expensive to by and less powerful than bulbs, but they are self-contanined and have an almost unlinited life. Baterry operated gusn are very compact and cheaper to purchase but the cost per picture is higher as a new bulb is required for each shot.
FLASH PICTURES CAN ONLY BE TAKEN AT A SHUTTER SPEED OF 1/30TH OF A SECOND. FOR BULBS THE SYNCHRONIZER SHOULD BE SET TO THE DOT ADJACENT TO " M" FOR FLASH BULBS AND " X "FOR ELECTRONIC ( IN THE CASE OF THE ZORKI 4) . THE SYNCHRONIZER CONTRL SHOULD BE SET TO " 15" FOR BULBS AND TO "0" FOR ELECTRONIC)
Small flashguns can be clipped into the accessory shoe on the top of the caemra but heavier guns will need a special "flash bar" which screws into the tripod bush of the camera. In both case the firing lead from the gun must be plugger into the socket on the front of the caemra body.
The exposure for flash is set by adusting the aperature and depends on the power of the gun . the sensitivity of the film in use and the distance of the flashgun from the subject. Most guns have calculators showing the correct aperature for each film speed and distance.
Removing Exposed film
After takin the last picture on the film you will have to rewind the film into its cassette before removing the camera back.
Place the lens cap back on he lens before attempting to rewind the film. Failure to do this could result in spoilage by fogging since the shutter, if only part-wound when the end of the film is reached, might remain open.
To rewind the film, turn the sleeve(4) around the release button( see fig G) and turn it clockwise wntil the end of the film released from the take-up spool ( you will know when this happens, as there is a slight click and a decrease in tension)
Remove the camera from its case, take off the back and take out the cassette of exposed film which should be processed as soon as possible. Return the rewind sleeve to its normal position wind on the shutter and release once. Note: if the shutter does not reset after winding check that the rewind sleeve has in fact been fully retrned to its norml position. the camera may be now reloaded.